
Introduction
Engaging your audiences is simple with Zoomph.
Our Activations (also known as "visuals") let you quickly create UGC hubs, live displays, and digital contests without having to code. More importantly, they let you keep your consumers at the center of attention and give them multiple ways to interact with your brand.
To create any activation, you'll need to utilize three Zoomph ingredients: feeds, moderation, and visual templates.
This guide will walk you through the above three elements and help you get started with your first activation.
Table of Contents
- Feeds
- Moderation
- Visuals
Feeds
Before creating a visual, you must first create a feed that'll pull in content. While visuals provide the backdrop or web page to hold content—your feed will be the engine filling the page with social media content or user submissions.
Note: a single feed can power multiple activations at once.
Navigating to Feeds
You can create a feed from a few different places in Zoomph:
- Home > Projects > '+Quick Create' > Feed
- Home > Feeds > '+ New Feed'
Creating a Feed
From the feed configuration menu, follow these quick steps:
- Define a title for your feed. This will only be viewable internally by your account members.
- Select which social media channels you’d like to curate content from.
- For each channel you select, connect a handle/account (branded or personal) to grant Zoomph permission to collect content on your behalf. Don't worry, we won't collect any private or personal information using this handle.
- Define the search criteria (hashtags, handles, keywords, phrases, or pages) that you’d like to track. Each channel has a different set of search terms that can be entered—check the guides that are provided for you on this page.
Where appropriate, search for exact phrase matches by entering words between quotation marks (e.g., “Zoomph rocks”). To search for posts published by a certain handle, add from:@handle as a search term. To search for posts that meet two or more criteria, simply enter multiple terms, separated by commas, as one search term (e.g., #Zoomph, #love). Refer to the channel guides to learn how to add fuzzy search, and/or other unique criteria.
For more help creating your first feed, refer to this article.
Moderation
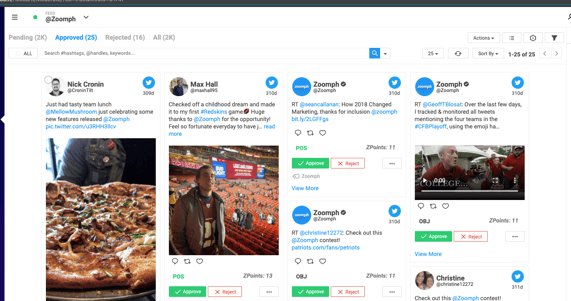
Moderation lets you view and sort through the content that has been collected by your feed. You can also approve posts that you want to display on your visuals from here, along with other actions.
Before launching any visual, make sure to approve content—otherwise, your visual will appear blank.
Navigating to Moderation
Access Moderation in one of several ways:
- Home > Projects > Feed > Moderation (icon)
- Home > Feed > Moderation
- Home > Polls > Moderation
- Home > Visuals > Moderation

Reading Your Dashboard
When you enter Moderation, you'll notice that everything is separated into four different buckets:
- Pending: Posts waiting to be approved or rejected. New items will automatically be added to this tab
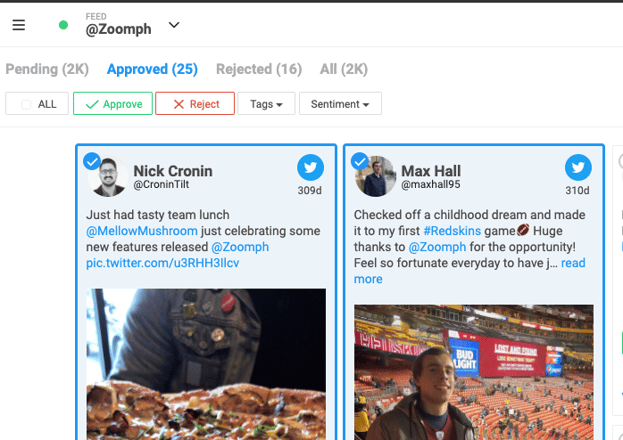
- Approved: Items that have been approved for display
- Rejected: Items that have been rejected and will not be shown on your visual
- All: All of the items currently in your feed, regardless of status
Click on any tab to see the corresponding content. You can also switch the way content appears on your screen: if you’d rather see content one by one, click the ‘list view’ button at the top of the page.
Approving and Rejecting Content
Handpick posts to show on your Zoomph visual by approving or rejecting them. Simply click APPROVE or REJECT on the bottom of any post.
After you choose an option, the button will fill with color. Rejected posts will also appear grayed put.
You can undo either action by clicking the buttons again.
To moderate content in bulk, hover over a post and click the circle that appears on the top-right corner of the card. After selecting all the items that you want, click APPROVE or REJECT at the top of the page.
You can also click the three dots at the bottom of any post to open a drop-down menu, which will reveal several quick-action options:
- View the post on social media
- Mark the author as spam (this will automatically mark any future posts by this author as spam so that your feed does not pull in their content)
- Auto-approve all future posts by this author that your feed may pull in
- Auto-reject all future posts by this author that your feed may pull in
Filtering and Sorting Content
To help you cut down time moderating content, your dashboard includes different sorting options.
On right side of the dashboard, you’ll see a full-length filter menu letting you find content based on create date, content type, tags, and more. To the left of the filter menu, you’ll also see several other options. From left to right:
- Search Bar: Enter the hashtags or keywords that you want to see content for. By clicking the drop-down menu to the right of the search bar, you can perform an author/handle search or advanced search.
- Items Per Page: By default, each page in Moderation will show 25 items. If you'd like to increase the number of post per page, open the numbered drop-down menu and you select 10, 25, 50, or 100.
- Refresh: To see the newest content in your feed or search, click the refresh button to reload your dashboard without having to reload the entire webpage.
- Sort By: Sort moderation by order of newness or ZPoints.
- Pages: After you’ve viewed all the content on any given page, use the < and > buttons to cycle through new or previous pages.
Visuals
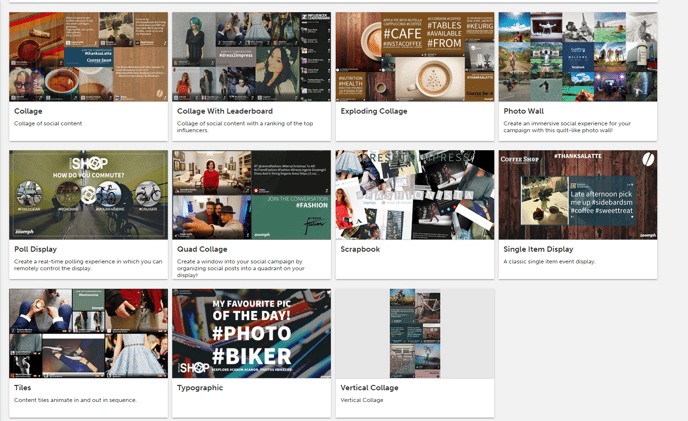
Zoomph has a variety of visual templates that service different uses, including:
- Live Displays: Full-screen UGC visuals that are great for events, office walls, and arenas
- UGC Hubs and Widgets: Web embeds that showcase UGC, which can serve as good social proof for your brand
- Campaigns: Digital contests, giveaways, and questionnaires for collecting user submissions and contact information
- Microsites: Stand-alone pages built on Zoomph's DIY website builder
Before creating a new visual, be sure you've completed the steps above for creating feeds, and moderating content.
While every template has a unique set of features and customization options, for this example,we'll create a Live Display.
Navigating to Visuals
You can create a visual from a few different places in Zoomph:
- Home > Projects > '+ Quick Create' > Visual
- Home > Visuals > '+ New Visual'
Example: Building a Live Display
On the templates page, select the type of visual you'd like to create. In this case, we clicked Live Displays > Collage.

While the different templates have unique functions and features, the steps in creating them are relatively the same:
- Title your display (this will only be viewable internally).
- Select the feed that you'd like to connect to your display. (Remember, you must approve content from Moderation for posts to appear on your display.) You can connect, disconnect, or swap feed any time.
- Pick the color scheme of your display. You can use our default themes or select the 'Custom' option to pick your desired colors. You can use our color picker or use hex color codes to match your exact branding.
- Customize how quickly your display refreshes content, how posts animate in and out, and more.
- Choose your callout text. The callout is the hashtag, handle or other action that you'd like your audience to use when posting so they can appear on your visual! This will appear automatically on your visual (different templates have it placed in different areas).
- Upload a custom background image and logo to your display.
- Click CREATE or LAUNCH. You can edit or view your display any time from your homepage.
For more detailed instructions on building a visual, view our articles under 'Activations.'
See also: our guide for Microsite Builder, one of our most powerful features for publishing immersive landing pages or long-form content.