The following is a list of commonly requested customizations you can make to your Zoomph visuals using the Data Sources, HTML, CSS of the "advanced edit" feature (available in the Marketing and Enterprise plans). Don't worry, these tips & tricks are simple, and require little to no coding experience!
To make advanced customizations to a visual, open the "advanced edit" and "override" on the code you would like to edit.
First tip: you can use the Ctrl+F hotkey function inside the code to quickly find the lines of code for any of these edits.
Customizing Fonts on Visuals
Using Google Fonts, you can change the fonts on any Zoomph visuals. Full steps and details here.
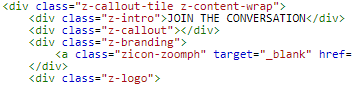
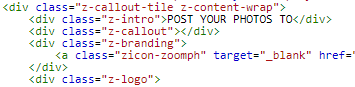
Changing the "Join the Conversation" callout-to-action
Some Zoomph visuals use "Join the Conversation" followed by a hashtag as the default CTA to encourage audiences to engage with your visuals.
To change that CTA, open the HTML of the visual, and locate "Join the Conversation" and edit the text to the desired action.
Collage Photo Cropping
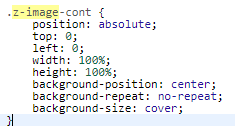
Some visuals, like the collage, center, and crop social photos so that any size photo can fit into certain tiles shapes. This can cause some photos to appear "cutoff" in some instances. A simple adjustment can be made to fit all photos into the collage tiles. As result, you will naturally see a background that fills in the empty space of the tile. For example, if you have a horizontal, rectangular photo fitted into a square tile, you'll see a background color above and beneath the photo.
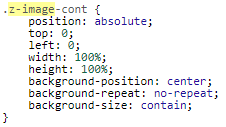
In the CSS of the collage, search for the class ".z-image-cont". Under this class, you'll find a property called "background-size" that is set to "cover". Simply change "cover" to "contain" and the photos will now be fitted into the collage tiles.
Removing Profiles from a Leaderboard
You can choose to remove any users from an influencer leaderboard. We refer to this as "blacklisting". Users often do this to remove their organization or internal profiles from skewing influencer leaderboards at events or contests where you only want attendees or participants ranked.
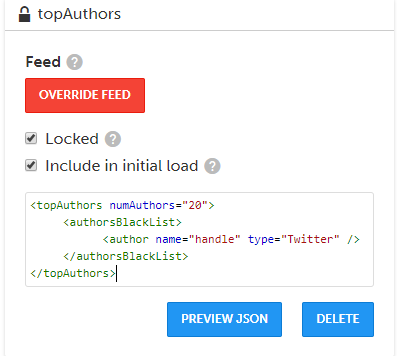
To blacklist a profile from a leaderboard, you'll need to go to the Data tab of the advanced edit and open the "topAuthors" data source. The data sources are what tell each visual what type of content to display, and in XML.
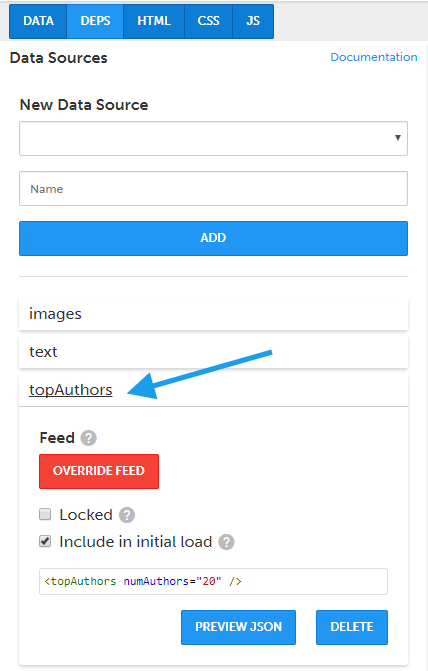
Copy and paste the XML below into the data source. Type the handle you'd like blacklisted in between the quotes after "name" and specify which social network the handle is after "type".
<topAuthors numAuthors="20">
<authorsBlackList>
<author name="handle" type="Twitter" />
</authorsBlackList>
</topAuthors>
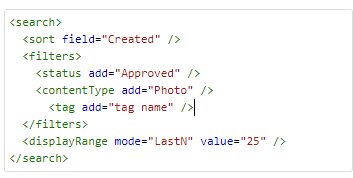
Filtering your Visuals by Tags
You can set up Zoomph visuals to only show content that has a specific tag you create in moderation. This allows you to have multiple visuals that are connected to the same feed but show different content. For example, you can have an event display that shows all approved posts, but separate widget using the same feed that only displays the specific content you tag.
To add a tag filter to your visual, open the "Data" tab in the advanced edit. In the XML of each data source, locate the <filters>. These are what control what sort content your visual can show. To add a tag filter, you can copy and paste the XML below or enter <tag and follow the autocomplete steps. Enter your tag in between the quotation marks.
<tag add="tag name" />