Create workflows to automate tagging, send alerts, or discard unwanted content
Workflows allow you to create custom automation's that are applied to your feeds within Zoomph so you can work more effectively and efficiently. Workflows use custom conditions (rules) that you create using Boolean logic. In layman's terms, Workflows uses combinations of 'if' and 'then' statements as criteria for different actions to take place. Workflows are great for tagging sponsor or campaign content, send email alerts, or discarding unwanted content from feeds.
Zoomph has two types of workflows:
- Custom: these are workflows that you create with your own events, conditions, and actions. Custom workflows can be changed at any time.
- Predefined: these are workflows created by our team (that cannot be changed) to help you start automating common actions. We do all the heavy lifting for you, and all you have to do is activate them.
Creating a workflow
Workflows consist of three main components:
- What Starts Your Workflow? These are different occurrences in Zoomph such as "when a new item is received in a feed".
- What Conditions Should Be Met? Conditions are the rules that must be true or false in order for your specified action to take place. Generally, any aspect of a social post can be a condition i.e. the username equals @starwars, or hashtags contains #skywalker, etc. Multiple conditions can be combined using 'All', 'Any' and 'None' statements.
- What Actions Should Be Performed? Actions are the end result of a workflow. Think of these as the processes you're looking to automate. You can do things like add tags, send emails, discard posts, moderate and more!
When creating a workflow, you assemble statements together that read "When an event happens...and item matches these conditions...perform these actions...".
To create a workflow, use the 'Quick Create' option from a project, or select 'New Workflow' from the 'Workflows' tab.

On the Workflows page, you can create new workflows, view and edit existing ones, enable or disable existing workflows, and see examples of common workflows that other users leverage. To start a new workflow, click 'Create New'.
Start by titling your workflow, setting it's status, and giving a description. This will help you easily determine what each of your workflows is doing from the Workflow home screen.

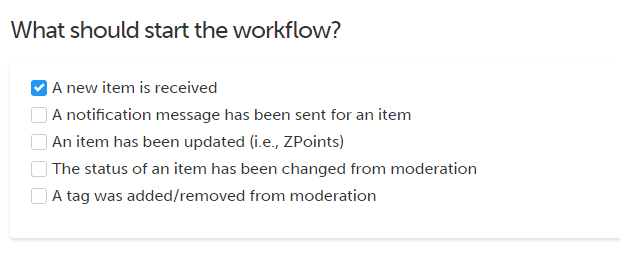
What should start the workflow?
Next, select the event that should start your workflow. At least one event should be selected, but you can also select multiple events. The following events can start a workflow:

- A new item is received: any time a new post is collected into a feed that meets your conditions, the workflow will be triggered. This is the most common event used.
- A notification message has been sent for an item: any time a tweet or comment is sent to post using the Notify tool that meets your conditions, the workflow will be triggered. Example - auto-tag the posts you've notified so you don't notify the same one twice.
- An Item has been updated (i.e. ZPoints): any time that a post is updated and meets your conditions, the workflow will be triggered. Example - you can auto-approve posts that see increase in ZPoints.
- The status of an item has been changed from moderation: any time a post is manually approved or rejected in moderation that meets your conditions, the workflow will be triggered. Example - auto-discard any posts that are rejected.
- A tag was added/removed from moderation: if a tag is manually added or deleted from a post that meets your conditions, the workflow will be triggered.
What conditions should be met?
After selecting your event(s), it's time to outline your conditions. Conditions are the criteria that must be met in order for your workflow to perform an action. You can view the full list of workflow conditions here.

You can use the Boolean conditions (all, any, and none) to combine multiple conditions together to create more specific criteria.
What actions should be performed?
The actions are the result of the workflow that you'd like to automate. In most instances, you'll start a workflow knowing exactly which action you want to automate, so it could be a good idea to start by setting your action(s).
Multiple actions can be taken from the same workflow so long as you're using the same set of events and conditions.
Workflows can perform the following actions:
- Add a tag to an item (great for categorizing content for analytics)
- Discard (delete content based on certain events or conditions)
- Send Email (think of this as getting email alerts)
- Set Status (moderation status)
- Set Age Range
- Set Gender
- Set Sentiment
- Set Geolocation
When your workflow is completed, you'll be given a preview of the content that is already in your feed that the workflow would be applied to if it was new so you can verify that the content you're looking to take action on is correct. Please note though that workflows are not applied retroactively to content already collected (only new content) so what you see in the preview will not be affected by the workflow.
When you've verified that your workflow is configured correctly, click 'Save' and you're all set!
