You can create and edit feeds from two places in Zoomph. One is from a Project via the 'Quick Create' button.
And the other is from the Feeds tab.


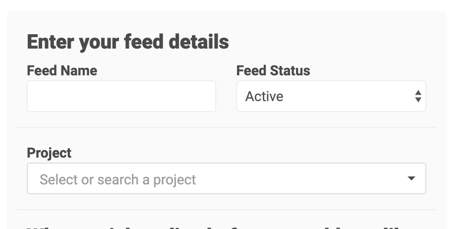
Title Your Feed
Enter a title for your feed. Use this to help keep your campaigns organized and is not public facing.
By default, your new feed's status is set to ACTIVE. If you do not wish to pull in data just yet, you can set the status to PAUSED. When you're ready to start collecting data, simply set it to ACTIVE.
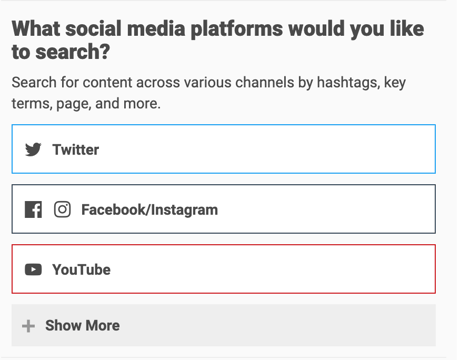
Select Your Social Networks
Select one or more social media platforms that you would like to collect content from.
A feed can pull social media content from either Twitter, Facebook, Instagram, and YouTube.
With each network that you select, you'll be prompted to connect a corresponding social account that allows us to collect the social content on your behalf.
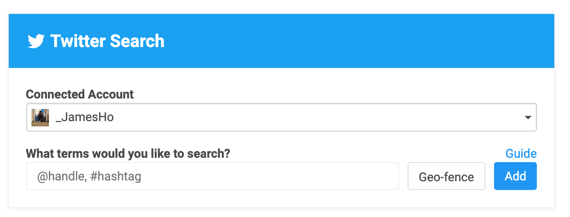
Connect Your Social Accounts
Sign into your Social Accounts to grant Zoomph permission to pull social data on your behalf.
For each Social Network you have selected, click the blue colored button that says CONNECT. You must already have an account with the social media site you want to collect from.
If this is your first time connecting your social accounts to Zoomph, clicking the CONNECT button will take you an authorization screen. Here you will need to follow the prompts to authorize Zoomph to use your account.
Pro Tip: You can connect any social accounts you'd like. These can be your brand/company handles, or your personal handles. Don't worry, we don't track or take any personal information, posts, or data. These are simply access tokens that allow Zoomph to speak with the social network.
Once you are connected, you will see your social handle and avatar next to the CONNECT button (see above).
Don't forget - if you've chosen the feed to pull from multiple social media channels, you'll have to connect your account for each one.
Please note: For security reasons, social accounts can only be connected to one Zoomph account.
If you receive an error message that says the social account you're trying to connect to Zoomph is already connected to a different account, just fill out a request form with the handle you'd like to connect and we will disconnect the handle from your old Zoomph account so that you can connect it to your new one.
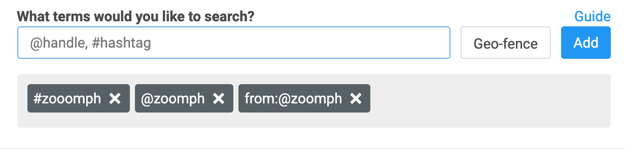
Configure Your Search Terms
For each Social Platform you have connected, specify the search terms to allow you to get the most relevant social content you need for your campaign.
The search terms are the hashtags, handles, keywords, etc. that you'd like to collect content around. Each social network has it's own unique set of search terms, so you can use our Search Guide (located on the right side of each network configuration) to see what terms can be used for each network. You can also check out our articles on configuring search terms as well.
Add search terms by typing them into the search box, and clicking the + button. You can separate multiple terms with a comma. When you add a term, you'll see it appear in a black box.
For Facebook and Instagram, you can make selection for tracking content from your owned, connected pages, as well as various searches.
Set Your Feed Capacity
After you've set your search terms, you need to set your Feed capacity. This is the total number of social content that your Feed can collect.
We allow you to control your capacity limits so that one search or feed does not take up all of your account's allotted data. This allows you to run multiple campaigns simultaneously.
One piece of social content is equivalent to either one tweet, one post, one picture, one comment. Learn more about what data and capacity are here.

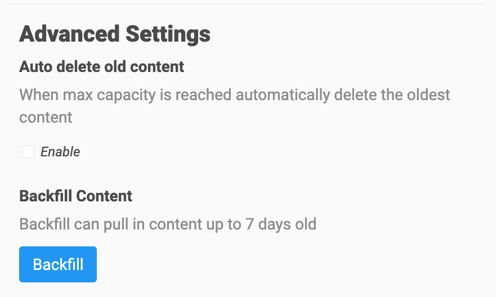
Advanced Settings
The advanced settings are entirely optional, and can be left untouched for normal use.
You can also elect to turn on the Auto-Delete Old Content feature, as well as Backfill.
Backfill is a feature that will automatically pull in a limited number of historical posts that were created before your feed is officially started.
Historical data is regulated by the respective social networks that we integrate with, but if historical data is critical to your project, contact us and we can purchase the historical on your behalf.
In the advanced settings, you can also set Pull From and Pull To dates for your feed. A Pull From date will allow you set feeds to start ahead in preparation of an event or campaign. With a Pull To date, you can set a feed to stop pulling dinner at a specific date.
Please note that you cannot set a Pull From date that is in the past.
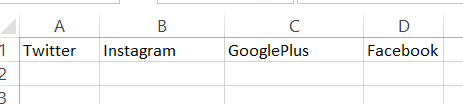
The final option in the advanced settings is to Import/Export your search terms via a CSV file.
If you find that you have too many search terms to manually enter, you add them into a formatted CSV file and upload them to your feed, which automatically adds the terms.
The columns of the CSV must contain a column forTwitter, Instagram, GooglePlus, and Facebook, even if you are not including search terms for a particular source.
After you've set all of your configurations, click Save and you're all set!